A
Anonymous
Guest
I have noticed that a couple of people have started to use Wings3D to create 3ds object for their NL coasters, and here is a thread dedicated to discuss the program and get help with it.

Wings3D is a free multi-platform 3d modeling software, that can be a bit tricky to learn, but when you get the hang of it then you will be able to create great stuff.
Links:
Home page: Wings3D homepage (main page with links and downloads)
Tutorials : PuzzledPaul's tutorials (good tutorials showing both basic and advanced stuff)
Developers Forum: Wings3D developer forum (a good place for asking questions and searching for answers)
Mouse:
RMB (Right Mouse Button): selection
MMB (Middle Mouse Button): start camera (change view)
LMB (Left Mouse Button): brings up menus, changes depending on selections, etc.
Scroll Wheel: Zoom
Interface:
When running the program this is the interface that greets you (more or less):
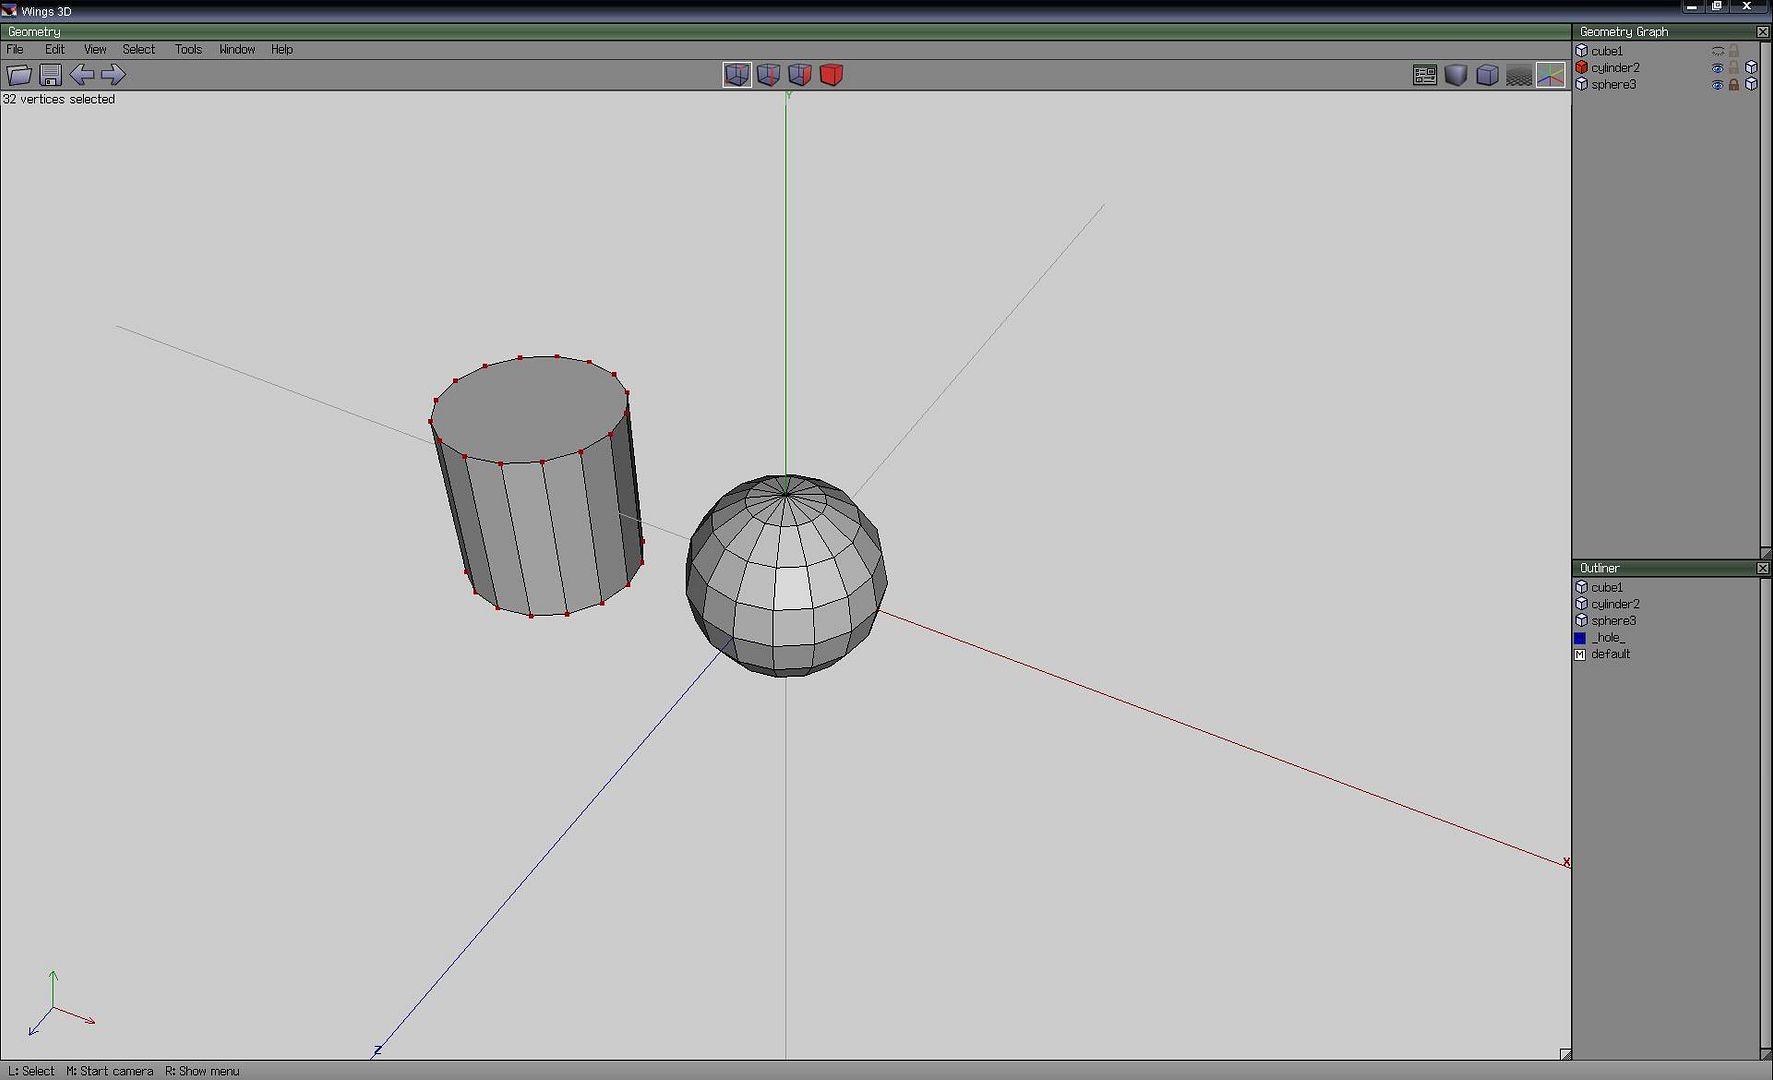
Click for big image.
Main Window:
Top Left:
Menu bar.
Open, Save, Undo and Redo buttons.
A row with useful information: positions, distance, edge length, area, amount of selected objects (etc.), distance moved, etc...
Top Center:
Way of selection: Node, Edge, Face or Whole object.
Top Right:
Preferences, Workmode, Orthographic view, Ground Plane and Axis buttons.
Bottom Left:
View Orientation
Bottom Row:
Shows what each button of the mouse do at a given time, L = LMB, M = MMB, R = RMB.
etc.
On the Right there is 2 windows that is found under the "Window" option on the Menu bar.
Geometry Graph:
Here you see all objects in your project.
Options from left to right:
Selection, shows is if any part of the object is selected (LMB select/deselect whole object, RMB select/deselect all objects).
Object Name, RMB brings up a menu.
Viewable, shows if the object can be seen (LMB view on/off, RMB view on/off all objects).
Locked, locks an object to make it unchangeable (LMB lock on/off, RMB lock on/off all objects).
Wireframe, makes an object into a wireframe (see through) (LMB wireframe on/off, RMB wireframe on/off all objects).
Outliner:
Shows all objects, imported images, materials, etc.
Useful keys:
Ctrl+z = undo/redo last
Ctrl+Alt+z = undo
Crtl+Shift+z = redo
a = aim to selection
x,y,z = view along axis (positive)
Shift+ x,y,z = view along axis (negative)
i = select similar
l = select loop
Space = deselect everything
d = redo last command (move, etc.)
tab = numeric entry
c = connect 2 or more nodes
1,2,3,...,0 cut selected edge in pressed pieces (0 = 10)
Ctrl, Alt, Shift becomes constraints when moving, scaling, extruding, etc (ex. pressing Shift while moving = move in steps of 1 unit length at a time), see/change values under Preferences > Constraints.
Pressing Alt while giving a command starts the magnet option (see more HERE)
To define new keys, highlight what you want with the pointer > press insert > press key (could screw up other keys).
Tips/Notes:
* Use advance menus (preferences > advanced), gives you more stuff, but could be tricky to use, but worth it.
* Use Orthographic view, easier to see stuff (same as NL).
* Use the latest build (development) as much as possible.
* You are able to change the camera mode under Preferences > Camera to make the camera work like in (some) other programs, that you might be used to (note the tutorials use the Wings3D/Mirai camera mode (me to)).
* Lock or make objects invisible to speed up the program/make it easier to construct.
* The best tip would probably to use the old NL Terraformer (found on NLDC) and export the track to a 3ds object and then import it to Wings3D so you can easily create stuff that fits around the track.
* Wings will suffer major slow downs when you start having very large/complex models, so you might want to fork them if that happens.
Guides:
Tutorial showing basic features (good place to start) (PP)
Colours / Materials
Textures
Textures (Take 2)
Feel free to ask/answer questions, and come with useful suggestion.
Wings3D is a free multi-platform 3d modeling software, that can be a bit tricky to learn, but when you get the hang of it then you will be able to create great stuff.
Links:
Home page: Wings3D homepage (main page with links and downloads)
Tutorials : PuzzledPaul's tutorials (good tutorials showing both basic and advanced stuff)
Developers Forum: Wings3D developer forum (a good place for asking questions and searching for answers)
Mouse:
RMB (Right Mouse Button): selection
MMB (Middle Mouse Button): start camera (change view)
LMB (Left Mouse Button): brings up menus, changes depending on selections, etc.
Scroll Wheel: Zoom
Interface:
When running the program this is the interface that greets you (more or less):
Click for big image.
Main Window:
Top Left:
Menu bar.
Open, Save, Undo and Redo buttons.
A row with useful information: positions, distance, edge length, area, amount of selected objects (etc.), distance moved, etc...
Top Center:
Way of selection: Node, Edge, Face or Whole object.
Top Right:
Preferences, Workmode, Orthographic view, Ground Plane and Axis buttons.
Bottom Left:
View Orientation
Bottom Row:
Shows what each button of the mouse do at a given time, L = LMB, M = MMB, R = RMB.
etc.
On the Right there is 2 windows that is found under the "Window" option on the Menu bar.
Geometry Graph:
Here you see all objects in your project.
Options from left to right:
Selection, shows is if any part of the object is selected (LMB select/deselect whole object, RMB select/deselect all objects).
Object Name, RMB brings up a menu.
Viewable, shows if the object can be seen (LMB view on/off, RMB view on/off all objects).
Locked, locks an object to make it unchangeable (LMB lock on/off, RMB lock on/off all objects).
Wireframe, makes an object into a wireframe (see through) (LMB wireframe on/off, RMB wireframe on/off all objects).
Outliner:
Shows all objects, imported images, materials, etc.
Useful keys:
Ctrl+z = undo/redo last
Ctrl+Alt+z = undo
Crtl+Shift+z = redo
a = aim to selection
x,y,z = view along axis (positive)
Shift+ x,y,z = view along axis (negative)
i = select similar
l = select loop
Space = deselect everything
d = redo last command (move, etc.)
tab = numeric entry
c = connect 2 or more nodes
1,2,3,...,0 cut selected edge in pressed pieces (0 = 10)
Ctrl, Alt, Shift becomes constraints when moving, scaling, extruding, etc (ex. pressing Shift while moving = move in steps of 1 unit length at a time), see/change values under Preferences > Constraints.
Pressing Alt while giving a command starts the magnet option (see more HERE)
To define new keys, highlight what you want with the pointer > press insert > press key (could screw up other keys).
Tips/Notes:
* Use advance menus (preferences > advanced), gives you more stuff, but could be tricky to use, but worth it.
* Use Orthographic view, easier to see stuff (same as NL).
* Use the latest build (development) as much as possible.
* You are able to change the camera mode under Preferences > Camera to make the camera work like in (some) other programs, that you might be used to (note the tutorials use the Wings3D/Mirai camera mode (me to)).
* Lock or make objects invisible to speed up the program/make it easier to construct.
* The best tip would probably to use the old NL Terraformer (found on NLDC) and export the track to a 3ds object and then import it to Wings3D so you can easily create stuff that fits around the track.
* Wings will suffer major slow downs when you start having very large/complex models, so you might want to fork them if that happens.
Guides:
Tutorial showing basic features (good place to start) (PP)
Colours / Materials
Textures
Textures (Take 2)
Feel free to ask/answer questions, and come with useful suggestion.

 lol
lol